

Abundant Skies: 8 Principles for Successful Rainwater Harvesting
Brad Lancaster
The following is a guest post by Brad Lancaster on rainwater harvesting. Energy scarcity and water scarcity are closely related phenomena, especially in certain parts of the world. While rainwater harvesting is no panacea for our water or energy problems, it may be a critical component in many regions for dealing with issues of scarcity. It is also an excellent example of a scale-free tool: it can be implemented by individuals, communities, or nations.
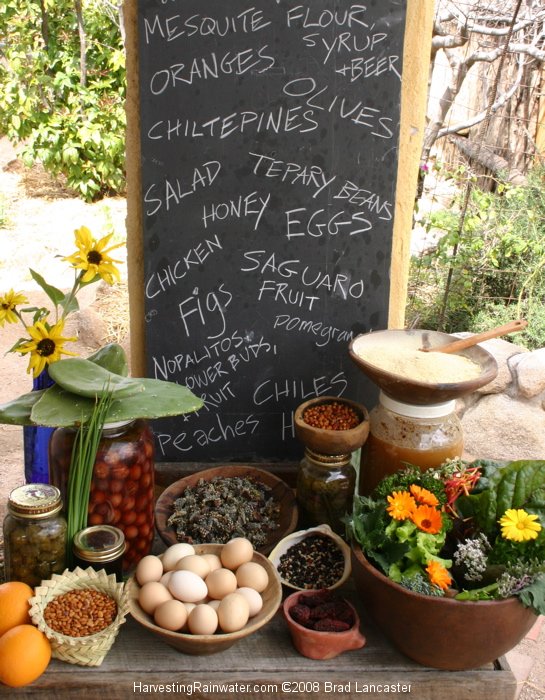
Food produced from rainwater on Brad Lancaster's Tucson residence
Brad Lancaster is a permaculture expert and consultant based in Tucson. His award-winning book Rainwater Harvesting for Drylands and Beyond, Volume I: Guiding Principles to Welcome Rain into your Life and Landscape (2006, Rainsource Press) and Rainwater Harvesting for Drylands and Beyond, Volume 2: Water-Harvesting Earthworks are available on the web at www.HarvestingRainwater.com and at amazon.com. This website also contains a bounty of free information, image, video, and audio resources.
My interest in water -harvesting arose from a desire both to reduce my cost of living and to be part of the solution rather than the problem in my desert city of Tucson, Arizona. One of Tucson’s biggest problems is its mismanagement of water resources, pulling more each year from the water table than nature can replace. This is a practice that has dried out the Santa Cruz river, killed countless springs and wells, and severely depleted available groundwater resources.
Living in the desert has put a special emphasis on water -harvesting for me, but it’s a valuable strategy for non-desert environments, too. Rainwater harvesting is effective for reducing or preventing erosion and downstream flooding while improving stormwater quality. Thus, Portland and Seattle have embraced water-harvesting to protect salmon populations, and Maryland is doing the same to protect the Chesapeake Bay. And anywhere in the world, water -harvesting is a smart strategy for helping to recharge groundwater tables, springs, wells, and rivers.
Back in 1994, my brother Rodd was also interested in water-harvesting, but as long as we were both renting, all we could do was read up on the subject. At the time, we were both self-employed, making what the government considers poverty wages. No bank would touch us. On our own, neither of us could afford to purchase a home, but together, it was feasible. (It helped that the house we wound up purchasing was about to be condemned.) We did 95% of the renovation work ourselves and used mainly salvaged materials.
Twelve years later, our property value has shot through the roof. The integrated water-harvesting techniques Rodd and I learned and implemented on this once-barren urban lot have transformed it into an oasis in the desert, with temperatures ranging an average ten degrees lower than our neighbors’. Our land produces 15-25% of our food, which includes organic, homegrown fruits, nuts, vegetables, eggs, honey, and mesquite flour grown solely with rainwater and greywater (reclaimed household wash-water.) Our utility bills have been dropping steadily since we moved in and now run an average $20 per month.
The Lancaster residence before renovation in 1994
2006, after renovation: rainwater and greywater utilized for food production, climate control, privacy.
In the course of creating our sustainable oasis here in Tucson, Rodd and I arrived at eight basic principles that anyone can use to implement a successful rainwater-harvesting strategy of their own.
Principle #1: Begin with long and thoughtful observation.
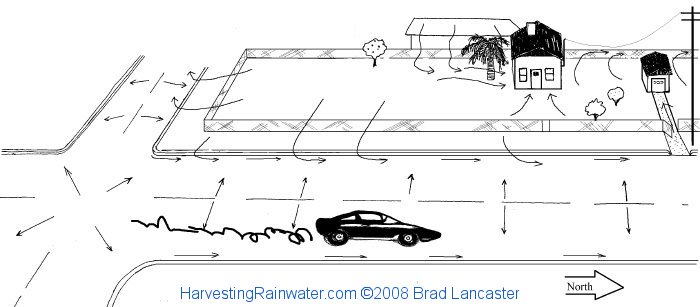
Right after we bought the house, monsoon rains poured from the sky. Rodd and I got acquainted with where where runoff pooled against the house and how the bulk of the rain ran off our site into the street. We mapped these observations, and others, including noise, head¬lights, and pollution from the street; where we wanted privacy; where we needed shade; and where we needed to enhance winter solar exposure. Wherever you direct rainwater in your landscape, you will be nurturing plant life, so take the time to make ensure this vegetation is part of your overall plan.
Next, calculate the rainwater resources available within your site's “watershed.” For us, that area included not only the 12 inches of annual rainfall on our roof and 1/8th of an acre property, but the 20 foot wide public right-of-way adjoining our property, the section of street draining past the right-of-way, and the runoff from our neighbor’s roof. (See Table, below) This totaled about 104,600 gallons (397,000 liters) of rainwater in an average year!
Principle #2: Start harvesting rain at the top of your watershed, then work your way down.
In most cases, the top of your watershed means the roof of your house.
Our leaky asphalt roof was a mess, so we removed it and installed 26-gauge galvanized steel metal roofing instead, which harvests rainwater in a potable form. However, as long as you’re only harvesting rainwater for use in landscape irrigation, this isn’t a necessary step. (Rainwater harvested off a conventional asphalt roof can also be made safe for consumption with the installation of an appropriate water filtration system.)
Take a look at your roof. Where do the gutters drain? Where is rainfall currently being directed? This is where you should begin with mulched water-harvesting basins and plantings (at least 10 feet from the building's foundation.) On our property, just under half of the roof runoff is directed to earthworks and fruit trees north of the house. The rest is directed to an above-ground cistern west of the garden along our property boundary on top of a 2-foot (60 cm) high earthen platform.
Our cistern is a custom-modified new ferro-cement septic tank, but a number of good alternatives exist. (See, Choosing a Tank.) We selected the location of our cistern to provide multiple functions. By placing it on the western boundary of our yard to shadeing out the hot afternoon sun, it creates a beneficial microclimate for our garden. By acting as part of the property line, it provides a privacy screen from a peering neighbor. And by placing the cistern on an elevated platform, the system utilizes gravity in circulating water from the roof’s gutter to the tank, and from the tank to the garden.
Whatever type of cistern you choose, having your garden located nearby will keep hose length to a minimum (25 ft. ideal) This will reduce water-pressure loss to surface-friction inside the hose and make watering with rainwater a convenience. (Your plants will love it too!)
Principle #3: Always plan an overflow route, and manage overflow as a resource.
Eventually, all water-harvesting systems will meet a storm that exceeds their capacity, so don’t get taken by surprise. All rainwater harvesting structures should be managed in such a way that the system can overflow in a beneficial, rather than destructive way.
In that spirit, overflow from our backyard cistern is directed via a 4-inch diameter overflow pipe gutters to a series of adjoining mulched basins that passively irrigate a citrus tree and our garden. In addition, all of our sunken earthworks have an overflow “spillway.” Typically, one earthwork overflows to another and another, until all are full and then, if needed, the lowest earthwork can overflow to a natural drainage–-or, in a typical urban context, the street.
Your goal should be to harvest the rain, but never get flooded by it. This is key.
4. Start with small and simple strategies that harvest the rain as close as possible to where it falls.
When people think of rainwater harvesting, usually it’s cisterns and tanks that spring to mind. But the water collected off your roof is typically much less than what’s actually falling on your property. Simple water-harvesting earthworks, such as basins, terraces, contour berms, and check dams will harvest the rain where it falls, on the land.
The water-harvesting earthworks Rodd and I created collect the vast majority of our rain. We dug level-bottomed basins and deeply mulched them (about 4 inches) in order to infiltrate rainfall and runoff throughout our watershed—once again starting at the highest points of the yard and working down. Overflow water was directed from the upper basins to the lower basins, which brings us to principle number five.
5. Spread, slow and infiltrate the flow of water into the soil.
Cisterns along with mulched and vegetated earthworks basins with overflow routes will effectively transform your erosive runoff during heavy rainfall into a calm, productive resource while reducing water loss to evaporation and downstream flooding.
Raised pathways and gathering areas are also a great strategy for spreading water through the landscape. This pattern of “high and dry” regions that drain to adjoining basins kept “sunken and moist” will help to define those areas through vegetation while spreading and sinking the flow of water. (This also helps keep ice off walkways and driveways in colder regions.) At our place, we also used earthworks to redirect the runoff that used to pool against our house to planting areas 10 feet or more away from the building's foundation.
6. Maximize living and organic groundcover.
All your basins and other water-harvesting earthworks should be well mulched and planted. This creates a “living sponge” effect that will utilize the harvested water to create food and beauty in your surrounding landscape while steadily improving the soil’s ability to infiltrate and hold water due to the vast network of growing roots and beneficial micro-organisms.
Groundcover is equally important in helping to ensure that, in your enthusiasm for harvesting rainwater, you don’t wind up creating a haven for mosquitoes. Mosquitoes need three days of standing water to transform from eggs to adults. Water-harvesting earthworks allowing water to infiltrate below the surface of the soil (typically within one hour) where it won’t be lost to evaporation.
Take a hike in the natural unmanaged areas near your home to determine what native vegetation would be best to plant within or beside your earthworks. Out in the wild, you'll notice which plants grow naturally in depressions – they can be planted within your basins. Wild plants preferring better drainage can be planted beside, but not within earthworks.
Blue palo verdes, velvet mesquite, chuparosa, oreganillo, and desert lavender are a few of the native plants found along the ephemeral washes in our area of Tucson that we plant within our earthworks.
7. Maximize beneficial relationships and efficiency by “stacking functions.”
As mentioned previously, water-harvesting strategies offer maximum benefits when they’re integrated into a comprehensive overall siteplan. We focused on locating the earthworks where we wanted to stack functions with multi-use vegetation.
Through rainwater harvesting earthworks, we’ve nurtured a solar arc of deciduous trees on the east, north, and west sides of our home that cool us in the summer, but let in the free light and warmth of the sun in winter. A living fence of native plants along the property line (along with an existing citrus tree) form part of a sun trap. This suntrap shades our garden from the afternoon sun, creates on-site stormwater control, and enhances habitat for native songbirds and butterflies.
The Big Picture
Within our generative landscape, rainwater has become our primary water source, greywater our secondary water source, and municipal groundwater a strictly and infrequently used supplemental source (meeting no more than 5% of our exterior water needs). Most of our established landscape has even become regenerative by thriving on rainwater alone.
Our household consumes less than 20,000 gallons of municipal water annually, with over 90% of that being recycled in the landscape as greywater. Additionally, we harvest and infiltrate over 100,000 gallons of rain and runoff into the soil of our site (and, by extension, the community's watershed) over the course of our annual average rainfall.
As a household, we’re shifting more and more to living within our rainwater “budget”: the natural limits of our local environment. As a result, we’re enriching the land, growing up to 25% of our food on site, creating a beautiful home and neighborhood environment – and giving back more than we take!
The further we go, the easier and more fun it gets, which brings us to the eighth and last principle:
8. Continually reassess your system and improve it.
Three years ago, Rodd and I set up an outdoor shower so the bather could either use pressurized municipal water at the showerhead or cistern water distributed from a shower bucket on a hook. Other strategies have included a solar-powered greywater “laundromat” in our backyard (utilized by seven neighboring households) along with a reduction in impermeable hardscape by replacing our asphalt driveway with lush plantings and earthworks.
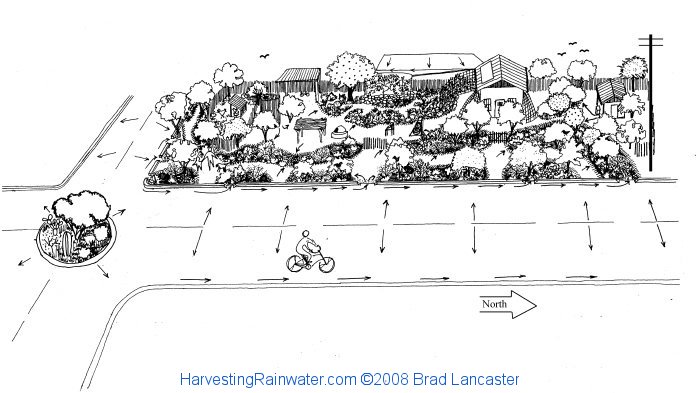
One of our most rewarding recent improvements has been the process of working with our neighbors and the city to replace 26% of the pavement from the corner intersection with a water-harvesting traffic circle planted with native vegetation. We also succeeded in implementing a system that harvests street runoff within curbside mulched basins to grow a greenbelt of trees along the street and sidewalk, so the street now passively irrigates the trees.
As a result, our neighborhood—once the victim of urban blight—is now one of the greenest and most livable areas of the city.
My advice to anyone who wants to get started living more sustainably is to start with rainwater-harvesting. Start at the top. Start small. But above all—start!
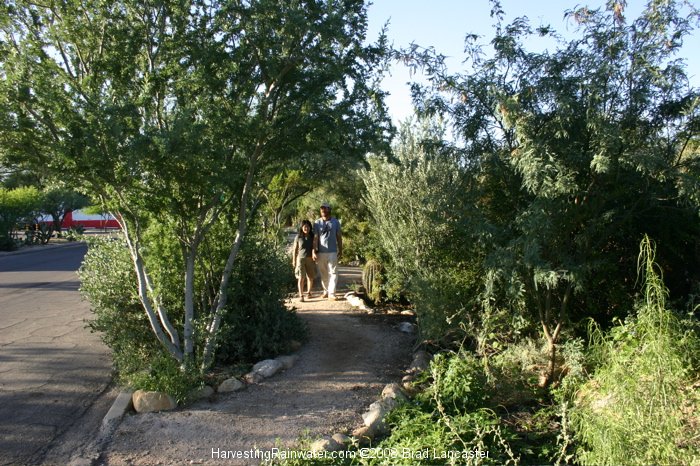
Enjoying a shady right-of-way produced by rainwater-irrigated, food-producing trees at the Lancaster residence
Sidebar: Choosing a Rainwater Cistern
Our cistern has a 1,200-gallon (4,560 liter) capacity. We selected this size after calculating the average annual roof runoff, assessing our water needs, and determining the resources we wanted to commit to the system. We opted for a precast concrete septic tank for a number of reasons, but primarily because it was affordable as well as a workable size and shape for our space (5 foot wide, 6 feet tall, 10 feet long).
Our septic tank was custom-made for use as a cistern, and further reinforced for above-ground installation. The cost back in 1996 was $600, which included delivery and placement. It's been working great ever since.
Other options for pre-manufactured cisterns include light-free dark green or black polyurethane plastic, corrugated metal, and fiberglass. See www.watertanks.com for options and look in the yellow pages under tanks for local suppliers.
Calculating Your Rainwater Resources
To calculate the volume of rain falling in an average year on a specific surface such as your roof, yard, or neighborhood, use the following calculation: CATCHMENT AREA (in square feet) multiplied by the AVERAGE ANNUAL RAINFALL (in feet) multiplied by 7.48 (to convert cubic feet to gallons) equals the TOTAL RAINWATER FALLING ON THAT CATCHMENT IN AN AVERAGE YEAR: CATCHMENT AREA (ft2) x RAINFALL (ft) x 7.48 gal/ft3 = TOTAL AVAILABLE RAINWATER (gal/year)